Sunday starts in ten minutes. The room feels fine in person, but the pastor’s face disappears into a dark patch the moment the livestream camera cuts in. The worship leader steps forward and gets a hard shadow under the eyes. You clip a sermon moment for social later, and the message is strong, but the video looks amateur before anyone hears a word.
That’s why lighting for small church stage work matters more than most churches think. It isn’t just about helping the room see the platform. It’s about making your message clear wherever people first encounter it. For a growing number of churches, that first encounter is a stream, a replay, or a short clip on a phone.
Small churches often assume good lighting is a “someday” upgrade. It’s usually not. A smart plan, a few well-placed fixtures, and simple control can change how your service feels in the room and how it looks online.
Why Great Lighting Matters for Modern Ministry
Bad audio drives people away fast. Bad lighting does the same thing.
If a pastor’s face is dim, if the worship team blends into the back wall, or if the stage looks flat on camera, people work harder than they should to stay engaged. In the room, that creates distance. Online, it creates scroll-past content. The message may be faithful and strong, but the visual presentation still shapes whether someone gives it a chance.
That matters because your livestream isn’t a side project anymore. It’s often the church’s digital front door. The same is true for sermon clips, worship moments, announcements, and recap content. Churches that want to reach their neighborhoods online need footage that looks clean enough to reuse.
The encouraging part is this. The vast majority of small churches can achieve professional polish for livestreams and worship with just 4 to 6 fixtures as a foundational minimum, focusing on quality placement over quantity according to Vorlane’s church stage lighting guide. That’s the difference between chasing gear and building a workable system.
Ministry impact starts with visibility
When faces are lit well, people connect faster. They read expression, emotion, and sincerity. That’s true from the back row, and it’s even more true on a camera shot that ends up in a weekly clip.
A lot of volunteer teams start with whatever white light is already in the ceiling. That usually creates a flat, shadow-heavy look. It’s functional, but it doesn’t direct attention. It also tends to make the platform feel smaller and less intentional than it really is.
Good lighting supports preaching, worship, and outreach at the same time. Few upgrades do all three.
Better lighting makes your media team’s job easier
If you’re also working on streaming, projection, or social, lighting reduces friction across the board. Camera operators don’t have to fight exposure changes as much. Editors have cleaner footage to cut. Social volunteers can pull a moment from Sunday and know it won’t fall apart on Instagram or YouTube.
If your church is also thinking through cameras, switching, and streaming workflows, this guide on video systems for churches pairs well with a lighting upgrade. Video and lighting always affect each other.
The point isn’t to make church feel like a concert. The point is to remove distractions so people can focus on the gospel, whether they’re seated in the room or seeing your church for the first time through a screen.
First Principles Planning Your Stage Lighting Zones
Most lighting problems start before anyone hangs a fixture. Churches buy lights first, then try to figure out where they go. Reverse that.
Take a sheet of paper, sketch your platform, and divide it into three simple zones. You don’t need CAD software. You need clarity. Doing so makes lighting for small church stage setups easier, because the choices become practical instead of overwhelming.
Right layout matters more than fancy gear.
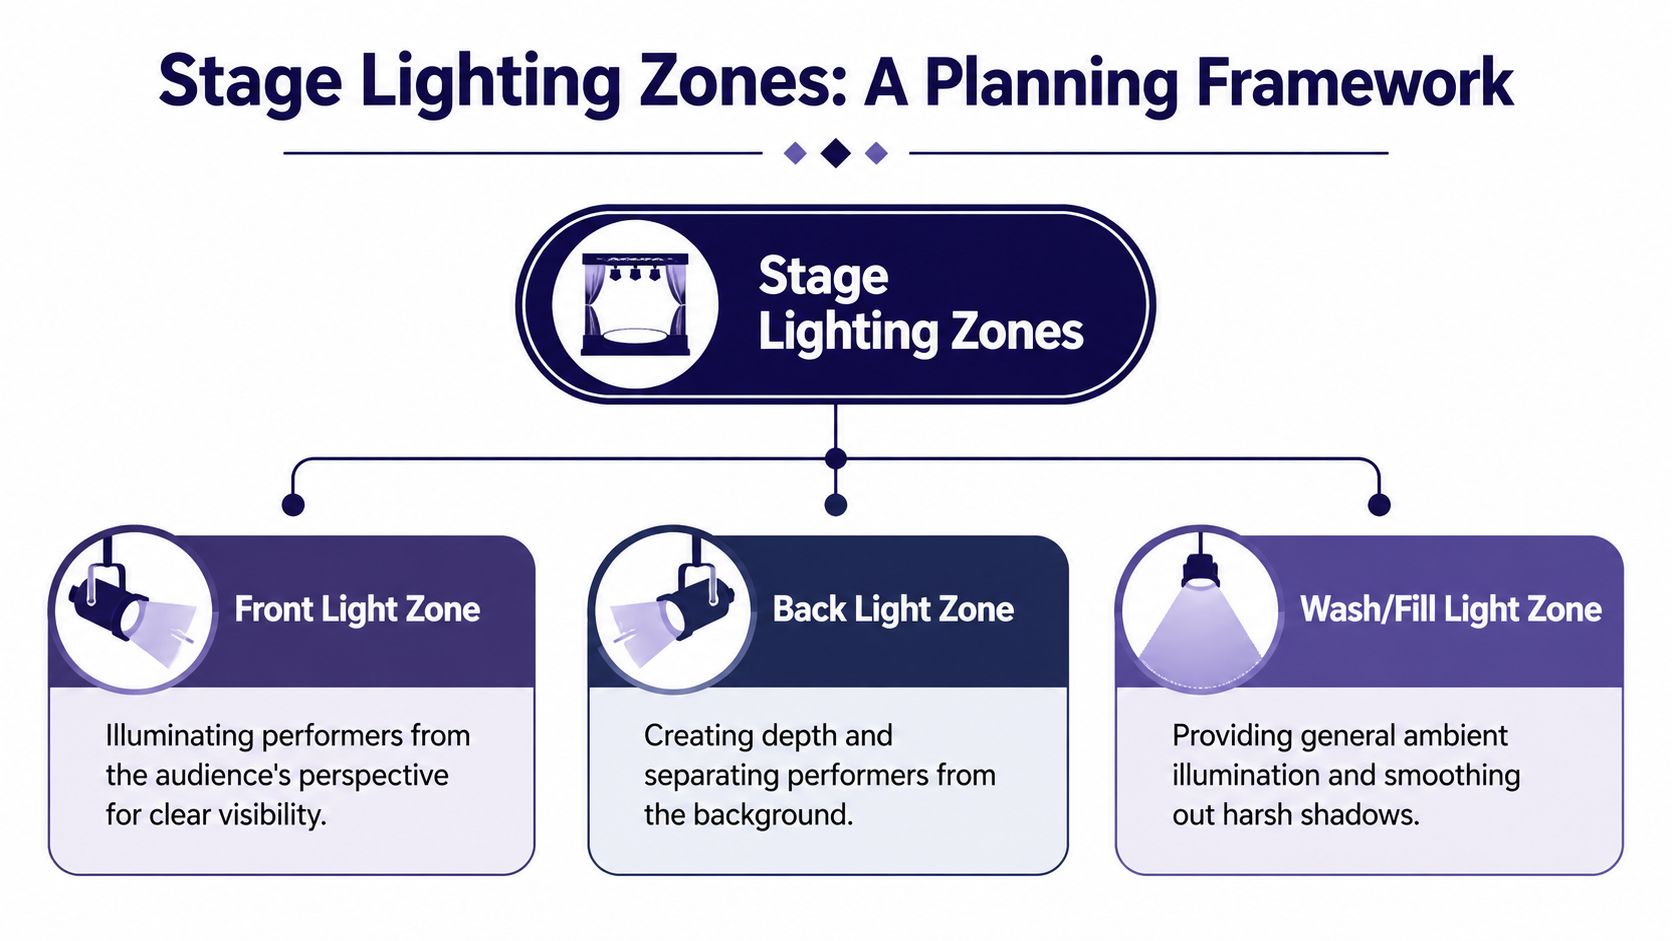
The key zone
This is the most important area on your stage. It’s where the pastor, host, reader, or main speaker stands. If this zone fails, the whole system feels off.
For small stages, front lights should hit this area from a downward angle, not straight-on from eye level. Mounting front lights at a 45-degree downward angle from the stage deck achieves 90% shadow-free illumination according to Collaborate Worship’s front lighting guide. Their placement rule is simple. Measure from the stage floor to the ceiling, then measure that same distance forward into the congregation to find the mounting point.
That one rule fixes a lot of common volunteer mistakes. It reduces raccoon-eye shadows, avoids blinding speakers, and gives cameras a more natural face light.
The worship zone
This area usually includes singers, acoustic players, keys, and sometimes a compact rhythm section. It needs coverage, but not all at the same priority as the pulpit.
Use the key zone as your anchor, then widen the wash so the rest of the team isn’t falling in and out of brightness. On a smaller platform, it helps to think in standing positions instead of broad coverage. Mark where vocalists stand. Mark the center mic. Mark the keyboard corner. Then light those targets.
A simple planning checklist helps:
- Draw the platform width and depth so you know what space really needs coverage.
- Mark the speaking position first because the sermon shot is usually the most reused camera content.
- Add worship positions next based on where people stand during songs.
- Note ceiling limits and mounting points so you plan around the room you have, not the room you wish you had.
The background zone
This is the part many churches skip. Then they wonder why the stage still looks flat after adding front lights.
Background lighting isn’t mainly about brightness. It’s about separation and depth. A lit back wall helps people stand out from the environment behind them. On camera, this matters a lot. Without it, faces can look pasted onto a dull, dark wall.
Use this zone for wall wash, soft color, or gentle accents on stage design elements. Keep it clean. One or two intentional colors usually look better than trying to show every fixture feature every Sunday.
Practical rule: If the people on stage are visible but the wall behind them disappears, the room will still look unfinished on video.
Build your plot before you spend
A rough paper plot will save you money. It tells you how many fixtures you need, what each one’s job is, and which purchases can wait.
If your church is also rethinking platform layout, this article on stage design for small churches can help you align lighting with the physical space. Stage design and lighting shouldn’t be separate conversations.
A small church doesn’t need a complex plot. It needs a clear one.
Choosing the Right Fixtures on a Small Church Budget
Once your zones are clear, fixture choices get simpler. You’re no longer asking, “What lights should we buy?” You’re asking, “What tool fits this job?”
For most small churches, three fixture types cover almost everything you need. PARs handle broad stage wash. Strips or battens light the background. Ellipsoidals create a more precise beam when you need one. You don’t have to buy all three on day one, but you should know what each does.

PARs are the workhorses
If a volunteer asks me where to start, I usually start here. LED PARs are the everyday fixture for small church stages because they’re flexible, common, and useful in almost every zone.
They can front light a speaker, wash a worship team, or light a backdrop depending on placement and lens spread. They also run cooler and draw less power than older incandescent fixtures, which makes them more comfortable in rooms with low ceilings and limited electrical headroom.
What they do well:
- Cover broad areas with general wash light
- Adapt to multiple roles as your layout changes
- Stay volunteer-friendly because setup is straightforward
What they don’t do well:
- Create a crisp edge around one person
- Hide bad placement if they’re mounted too low or aimed poorly
Strips make a room feel finished
LED strips, battens, or simple linear fixtures are great for background lighting. Their job isn’t to carry the whole stage. Their job is to create color, separation, and visual depth on the wall, drape, or scenic element behind the platform.
This is one of the cheapest ways to make a stage feel intentional without turning worship into a light show. If your front light is decent but your stream still looks bland, the missing piece is often the back wall.
A good strip fixture can:
- Wash a flat wall evenly
- Add mood without touching face light
- Support different service moments without changing the whole rig
Ellipsoidals are precise
A single LED ellipsoidal, often called a Leko in church tech conversations, is useful when one position matters a lot. Think pulpit, teaching spot, or center-stage reading position.
Unlike a PAR, an ellipsoidal gives you more control over beam shape and spill. That makes it helpful when your stage is tight and you don’t want light bleeding onto screens, banners, or side walls.
If your pastor always preaches from one place, one precise fixture can do more for clarity than several loosely aimed ones.
What to choose first
Here’s the simple order I’d recommend for most churches:
| Fixture type | Best use | Easiest first purchase |
|---|---|---|
| PAR | Front wash and general stage lighting | Yes |
| Strip | Background color and depth | Yes, after front light |
| Ellipsoidal | Focused teaching position | Only if your layout needs precision |
If budget is tight, start with PARs. Add strips when you want the room to feel less flat. Add an ellipsoidal when you need cleaner focus on a consistent speaking position.
Budgeting and Building Your System in Phases
Lighting gets expensive when churches try to solve every problem at once. It gets manageable when they build in phases.
That approach is practical for both money and volunteers. You install the part that makes the biggest difference, learn how to use it well, and then add the next layer. For lighting for small church stage projects, that usually means starting with visibility, then adding depth, then mood.
Start with the budget reality
A polished starter system for a small church stage typically costs between $2,000 and $5,000, and a smart budget puts 60 to 70% into LED fixtures, 15 to 20% into a DMX controller, and 15 to 20% into stands, clamps, and cables according to SHEHDS budget guidance for church stage lighting.
That breakdown is helpful because churches often budget for fixtures and forget the support gear. Then install day arrives and nobody accounted for clamps, signal cable, mounting hardware, or a controller that can run scenes.
Build in three phases
The easiest way to keep leadership aligned is to tie each phase to a ministry result.
Phase 1 is front wash. This is the first money you should spend because it improves preaching visibility immediately.
Phase 2 adds back light or wall wash. At this point, the stage stops looking flat and starts gaining depth.
Phase 3 brings accent or mood options. This isn’t frivolous. It helps the room support different moments without constant manual tweaking.
Here’s a simple planning view:
| Budget Tier | Approximate Cost | What You Get | Best For |
|---|---|---|---|
| Front wash starter | $500 to $1,000 | Basic front lighting for clearer faces | Churches beginning with one main speaking area |
| Polished starter system | $2,000 to $5,000 | 4 to 8 LED PAR fixtures, control, and accessories | Churches wanting a balanced in-room and livestream setup |
| Phased expansion | Add in stages | Back light, wall wash, and mood layers as budget allows | Churches improving over time without replacing everything |
Show leadership what each phase solves
Finance teams respond better when they see outcomes instead of gear lists.
- Front wash phase fixes hard-to-see faces and weak sermon video.
- Depth phase separates people from the background and improves camera image.
- Mood phase gives you service-specific looks without rebuilding the system each week.
A small church doesn’t need to apologize for phasing. That’s often the wisest path. It also makes training easier because volunteers learn one layer at a time.
If your lighting decisions connect to booth workflow, volunteer roles, and Sunday operations, this article on the church tech booth is useful reading for the bigger picture.
Controlling Your Lights From Simple to Dynamic
A lot of churches buy decent fixtures and then leave them in whatever mode they came with. That wastes the upgrade.
Control doesn’t have to mean a big console or a dedicated lighting director. For a small church, control usually means one thing. Repeatable looks that a volunteer can run confidently. If the room can move from sermon to worship to prayer with one button press, you’re in a good place.
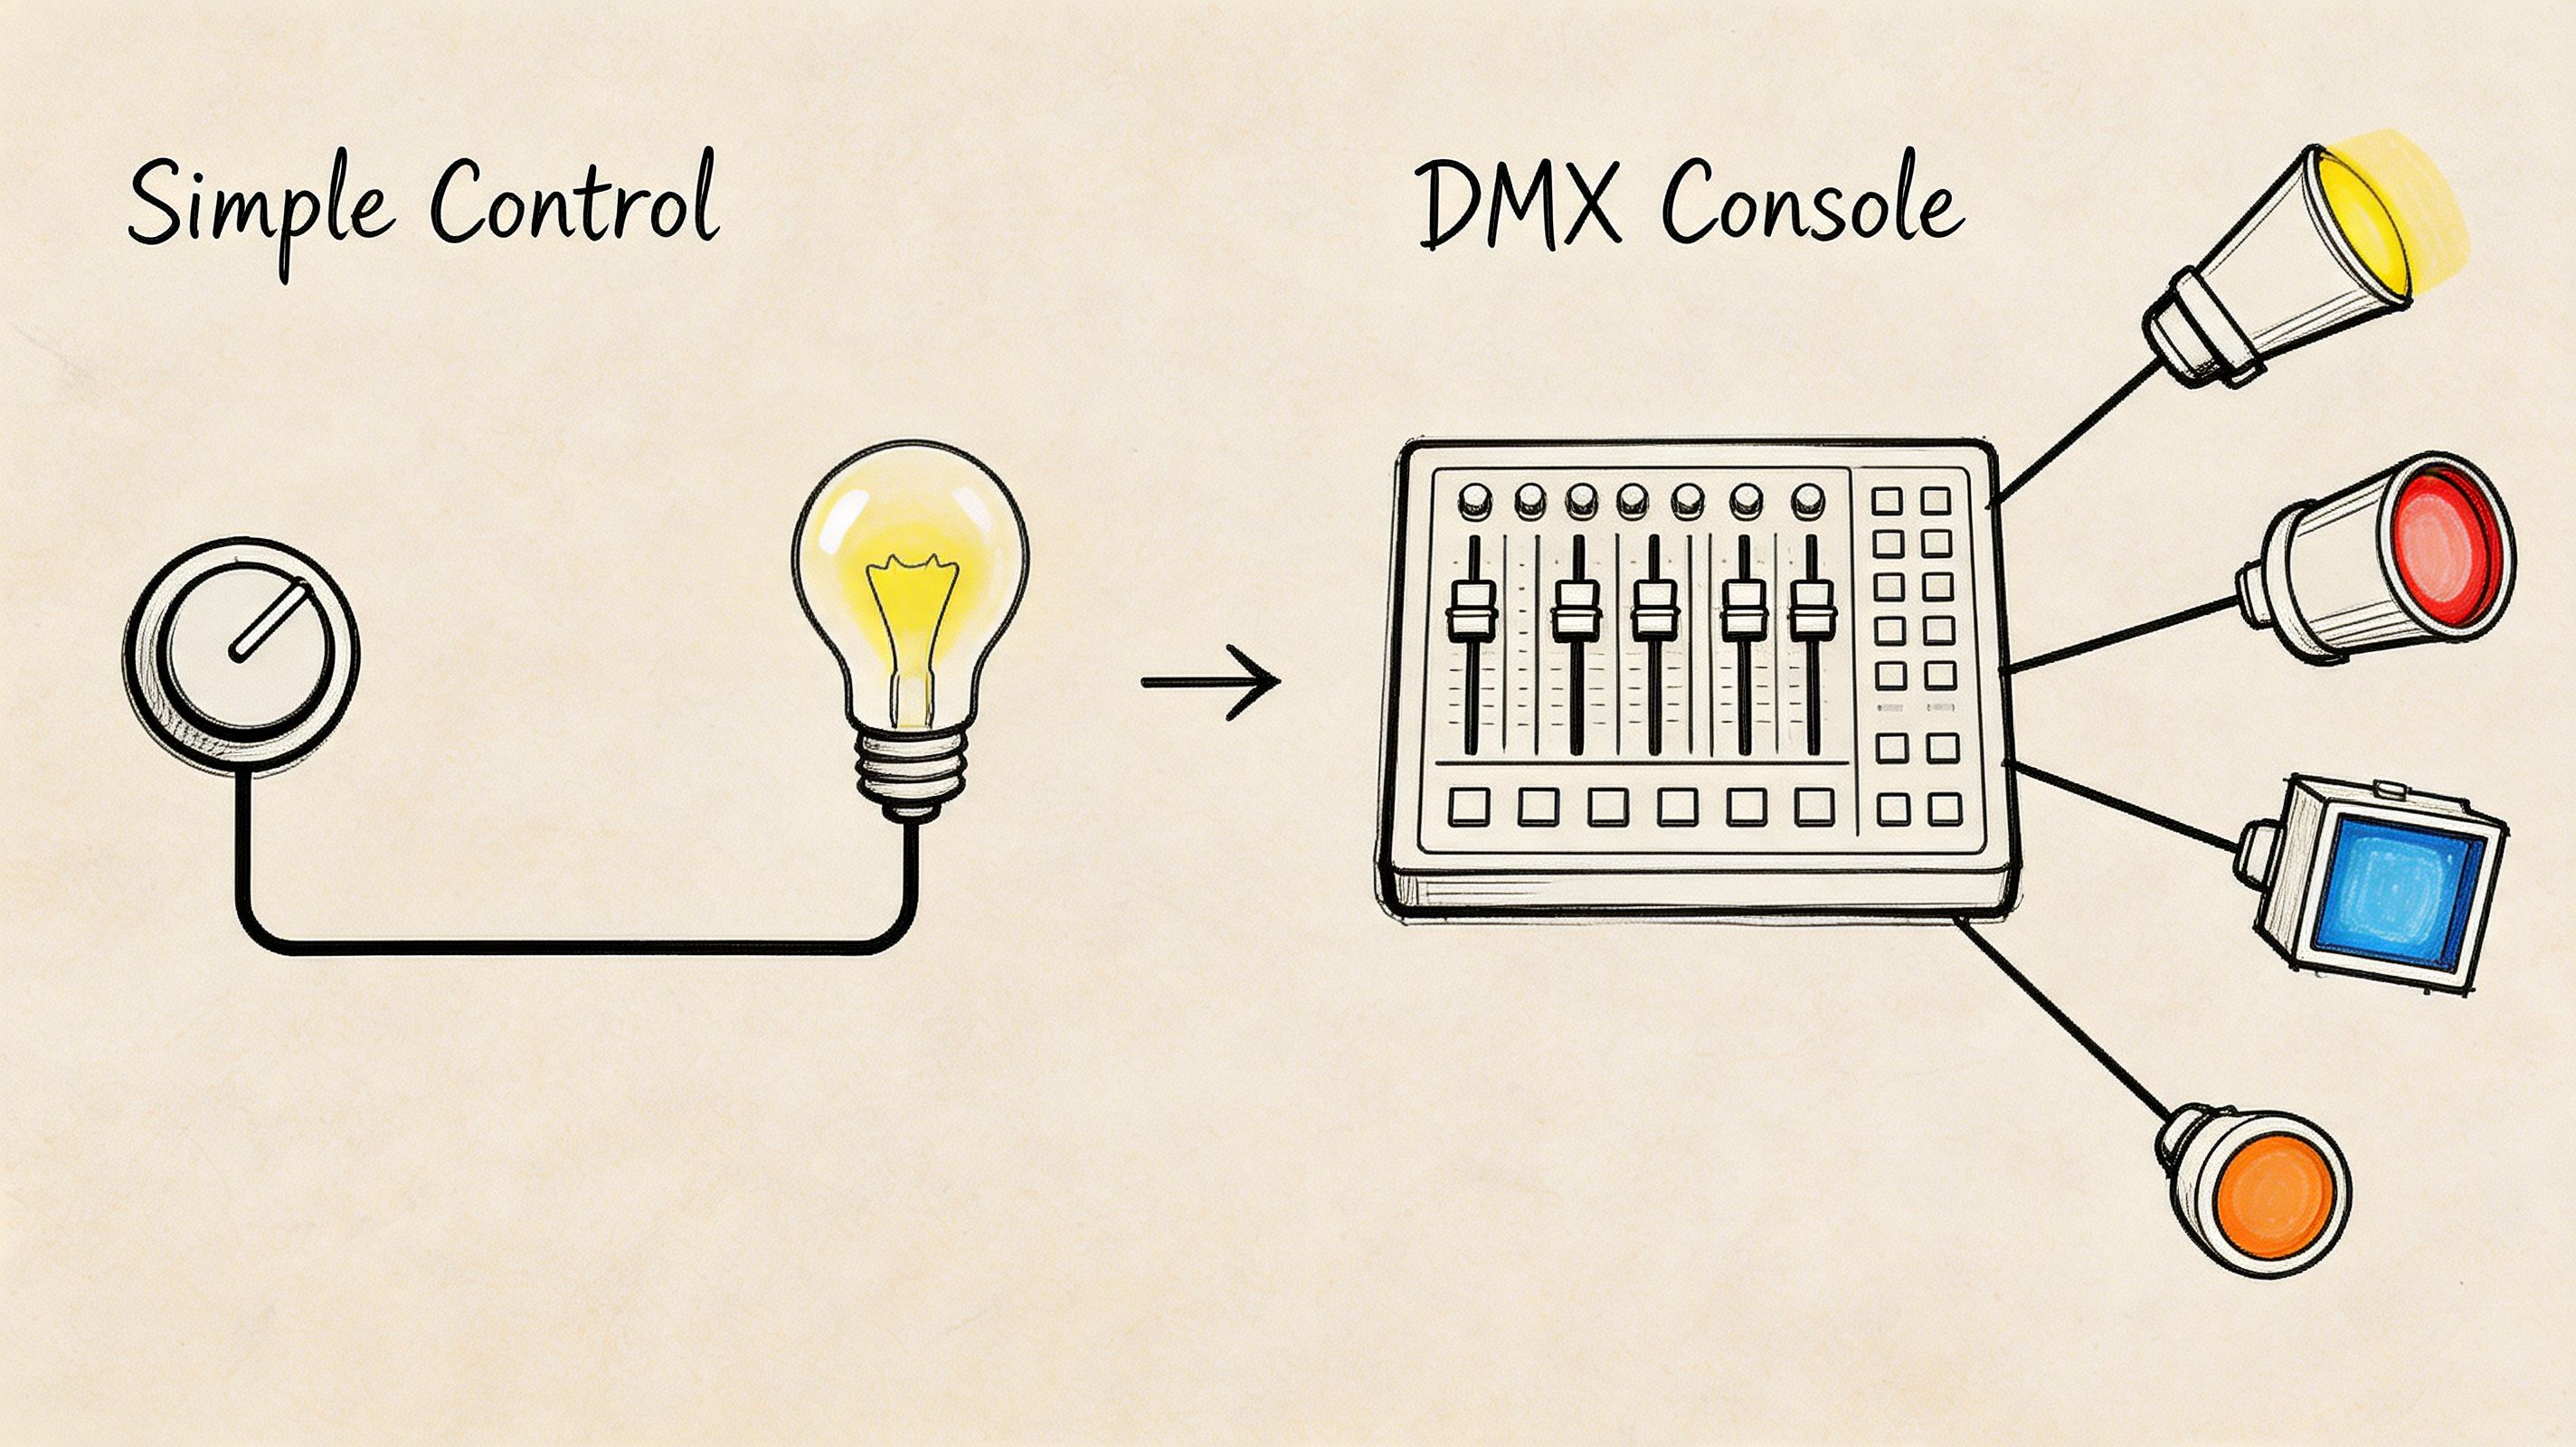
Start as simple as your team needs
The lowest-complexity setup is basically set-and-forget. Lights get aimed, intensity gets dialed in, and they stay there every week. For some churches, that’s a valid first step.
The next level is grouped control. Front lights together. Background lights together. Accent lights together. Even that gives you useful flexibility without much training overhead.
Then comes DMX. DMX is simply the control language that lets fixtures respond to a board or software. Once volunteers understand that, the fear drops fast.
Program scenes, not individual moves
Volunteers struggle when they have to build a look live. They do much better with presets.
A good starter scene list might include:
- Sermon look with clean front light and restrained background color
- Worship look with fuller stage coverage and richer backdrop color
- Prayer look with softer overall intensity
- Announcement look with bright, clear face light for video capture
The payoff of zoning becomes evident. When your fixtures are grouped by purpose, scene building becomes logical instead of chaotic.
Why presets matter
Pre-programmed scenes reduce mistakes and make the room feel intentional. They also help online viewers stay visually oriented through the service.
Implementing zoned lighting with pre-programmed DMX scenes for different service elements can boost audience engagement by as much as 40%, according to Church Stage Design Ideas’ LED stage lighting guide. Even if a church never measures that directly, the principle holds up in practice. Thoughtful visual changes help people follow the moment.
Don’t hand a volunteer six faders and hope for artistry. Give them four reliable scenes and they’ll serve the room better.
A workable volunteer workflow
Try this Sunday rhythm:
- Power up and confirm fixture communication before rehearsal.
- Test each scene in order so nobody discovers a bad cue during service.
- Assign one operator decision point for transitions. Usually that’s worship leader handoff, pastor walk-up, or prayer start.
- Leave room for one emergency override in case the room changes unexpectedly.
That’s dynamic enough to feel polished and simple enough to survive real church life.
Installation Safety and Common Troubleshooting Tips
A good-looking rig that isn’t installed safely isn’t a win. In smaller churches, volunteers often mount lights on stands, ceiling points, or short pipes without much margin for error. Slow down and secure everything.

Safety that isn't optional
Use this checklist every time:
- Attach safety cables on every overhead fixture, even if the clamp feels solid.
- Stabilize stands fully and keep them out of walk paths where possible.
- Dress cables cleanly so volunteers and musicians aren’t stepping over power or DMX lines.
- Check electrical load carefully before adding more fixtures to an existing circuit.
- Keep adjustment tools nearby so nobody improvises with the wrong hardware during rehearsal.
If your team needs a basic wiring refresher outside the church-specific world, this pro guide to smart lighting from Home AV Pros is a helpful general primer on planning connections cleanly and safely.
Quick fixes volunteers can handle
Most Sunday lighting problems fall into a short list.
| Problem | First thing to check | Usual fix |
|---|---|---|
| Flickering fixture | Cable connection | Reseat or replace the cable |
| Hotspots on faces | Aim and angle | Re-aim the front light |
| Wrong color output | DMX address or mode | Match addressing and fixture mode |
| Light not responding | Power and signal path | Confirm power, then trace DMX chain |
A lot of “broken light” reports turn out to be addressing mistakes, loose cables, or a fixture left in the wrong operating mode.
Keep a printed troubleshooting sheet in the booth. Volunteers make faster decisions when the first checks are obvious.
Your Next Steps and Lighting Questions Answered
The biggest blind spot in church lighting advice is camera use. Many guides talk about what the room sees and ignore what the lens sees. That’s a problem if your ministry includes livestreaming, sermon clips, or short-form content.
A key point from SHEHDS on camera-specific church lighting needs is that good lighting for video requires a high Color Rendering Index (CRI) and specific angles to avoid harsh shadows on screen, and that directly affects livestreams and social media clips. In plain language, cameras need clean, flattering light on faces. If the angle is wrong, the room might tolerate it while the stream looks rough.
Common questions churches ask
Do we need a lighting operator every week?
Not necessarily. Many small churches do well with prebuilt scenes and a volunteer who only triggers a few moments.
What’s the biggest mistake to avoid?
Buying fixtures before mapping your stage. A modest system with a plan beats a bigger pile of gear every time.
Why does our room look okay in person but weak online?
Because people can adapt to a room faster than a camera can. Camera image quality depends heavily on face light, color quality, and background separation.
What to do next
Walk the room with a notebook. Mark your speaking position, worship positions, and wall areas that need depth. Then identify what’s missing first. Usually that’s front light.
If you want a broader outside look at residential and commercial lighting practice, these Cultivate HD lighting experts offer a useful example of how professionals think about appearance, placement, and visual impact. The context is different, but the planning mindset carries over.
Start simple. Light faces well. Build scenes your team can run. Then let the camera benefit from every decision you made for the room.
If your church is improving lighting so sermons and worship look better online, pair that with a tool that helps you effectively use the content. ChurchSocial.ai helps churches turn sermon footage into AI-generated reels, create posts and blogs from transcripts, design graphics with templates, and manage everything in a drag-and-drop social calendar. It also connects with Planning Center and other calendars so your events can feed your content workflow without extra admin work.